I had to make Q's valentines for his classmates and I wanted to do something fun, not "run-of-the-mill" (not that there is anything wrong with that). I called Kathy, my Martha Stewart friend who has made tons of holiday goodies for her daughter's classes over the years. I wanted to pick her brain about a Valentine's treat that would be appropriate for 2 year olds. She suggested "crayon hearts" and she told me to go to the family fun website to get the instructions. It was SUPER EASY and this is how I did it.
This is what you need:
* Crayons (Kathy said to only get Crayola, so I did. I do what she tells me ;) )
I used 2 boxes of 24 crayons and it made about 19 1.5 inch heart crayons.
* Heart shaped rubber candy mold (that can go in the oven). The molds should be about 1.5 inches in diameter
*scrap paper
* card stock paper
* double sided tape (I used the puffy kind)
I used as well (although the instructions did not say):
* A Valentine's stamp
*Letter stamps
*Clear cellophane "goodie bags"
*Valentine's Day ribbon
* A small hole puncher
INSTRUCTIONS
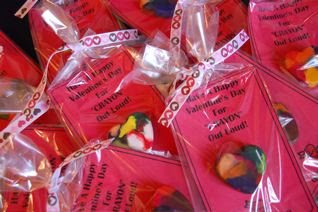
1. I created the cards on my computer in paint.net (only on a PC -- I did not use my Mac at home) and made 3 to a page. The slogan the site suggested that I used was "Have a happy Valentine's Day for "CRAYON" out loud!". Another one that I thought was cute was "You color my world" -- but that one seemed more appropriate for a girl to give. You can do whatever you like -- just remember the crayon is about 1.5 inches wide and your "goodie bag" that you will put the finished Valentine in is only so wide and so tall and it will have to fit. I printed them out on red card stock. The paper needs to be a heavy weight to support the weight of the crayon without flopping over.
2. Cut them out. I had some "help"... Q cut up the scrap paper and he quickly lost interest when he could not manipulate the scissors (and yes they were children's safety scissors).
3. Peel the crayons. Let me save you some time -- get a razor and cut down the length of the crayon -- that way the paper comes right off as opposed to you having to sit there for 5 hours widdling away at crayon wrappers and getting waxy funk all up under your nails. Obviously this is the part the kids DO NOT DO -- only Mom and Dad. I figured this trick out all by myself and yes, I did cut my fingers twice so be careful and do not drink while doing this (I was not drinking, just clumsy).
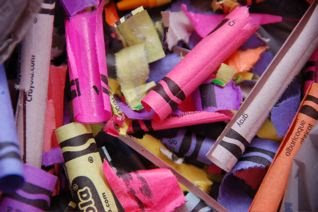

4. Break the naked crayons in to pieces about 3/4 of an inch long. Q helped but I had to generally go back and make the pieces even smaller.

5. Preheat your oven to 250 degrees.
6. Fill the mold with the crayon pieces. Corby had to come in the kitchen and get his hands into what I was doing. I was glad for the help though. My little helper was napping. Be sure to put a good mix of colors in the molds and fill them up pretty full!


7. Pop the mold in the oven for 10-15 minutes until the wax has melted. If you do use a silicone mold like I did, then be sure to put a cookie tray UNDER it when you put it in the oven otherwise it is so unstable that pulling it out of the oven after the fact, may cause the melted wax to run out and spill out of the molds.
8. While the mold is in the oven, make your tags for the goodie bags. I used my big round craft punch -- about the size of the lid of a can of soup. I just used construction paper and cut out several circles of colored paper in Valentine's colors.

9. I then used my red ink pad and the Valentine's Stamp I chose. I stamped my Valentine's Day message on one side. I will take this opportunity to shamelessly plug A.C. Moore craft store (woot, woot, CJ). It is my favorite, by far. I get all of my stamps and art supplies from A.C. Moore. They have the best selection and the prices are better than anywhere else I have found. Michael's is the worst and Hobby Lobby comes in second for price and selection. I got my Valentine's Day stamp for 1.00 at A.C. Moore.

10. I then used my individual letter stamps to stamp the names of the children in Q's class (get the list of names from your teacher ahead of time) on the back of each one of the tags. I also made several additional ones for his best friends and our neighborhood children. I think I got this little set of letter stamps at the Dollar Tree -- yet another of my favorite places and yes, they were only a dollar.


11. Take the heart mold out of the oven very carefully. Note: I made Corby put on the glove and do the dirty work (don't mind the dirty oven).
12. Let them cool about 15 to 30 minutes until they are VERY HARD -- not even a little bit soft -- they could get distorted. Pop them out. Look at them and think, "gosh those sure are cute and I made them!" Then rub the bottoms of the heart crayons (what was the "top" when in the mold) on your scrap paper to rub off the hard edges.
13. Then use the double sided tape (I tried glue dots, but the ones I had were too small) to stick your heart crayons to your Valentine's cards.
14. Put them in their clear goodie bags, punch holes in your tags and tie them on and the goodie bag up with your Valentine ribbon! Voila! You are done!

P.S. I know you all are jealous of my sweet BLUE counter tops! They are pretty awesome, I know. Despite the fact that they are "Cool, Rocking Out" (Caroline Q) I am getting some new ones next week!


No comments:
Post a Comment
Thanks for the comment chumpee!